Your first onboarding setup
Userflow makes it very easy to build great user onboarding. An initial onboarding setup is typically also the first thing a Userflow customer will build. Therefore we have created this guide to explain how one can build a great onboarding experience similar to what you can see in this example.
If you prefer to watch a video series, then check out Your First Userflow Onboarding.
All of the steps below have been made available to you in our Userflow checklist, that you can start by clicking this link.
The structure of your first onboarding setup
The easiest way to get started with Userflow is to think about building 3 kinds of content for your app:
- A single welcome modal that greets new users.
- 2-3 flows that quickly take the user to their first “aha!” moment(s), each flow could correspond to a task in the checklist.
- A “Get started” checklist that aggregates the flows and hints at what the user should/could do next.
Later, you can get much more advanced, and we have some ideas for that at the end of this guide. But the above outline is a great and quick way to get started.
To make the rest of your setup more efficient, start by writing down the 2-4 short journeys that you’d like to take users through to give them their first “aha” moments. Some ideas:
- Create some key content, like a project
- Do a key action, like registering time against the project
- Add users (to show collaboration aspects)
- Select Plan (to show the pricing and what features they can get)
Once you have your tour ideas, continue to the first Userflow step of building the Welcome modal.
Step 1: Create a welcome modal
A great way to welcome first-time users to your product is by making a welcome modal. In Userflow you can do this by going to Flows → Create flow.
- You can set the auto-start condition to be based on a user attribute of “Signed up less than 1 day ago” and that it should only start once per user and with high priority. (If you want to learn more about how to get user attributes into Userflow, check out the Userflow.js docs).
- Change the first step to be of the content type Modal by clicking on the gear icon on the step.
- Write a nice welcome text, potentially making it personal using the Name attribute (or First Name if you have configured your Userflow.js snippet to send this).
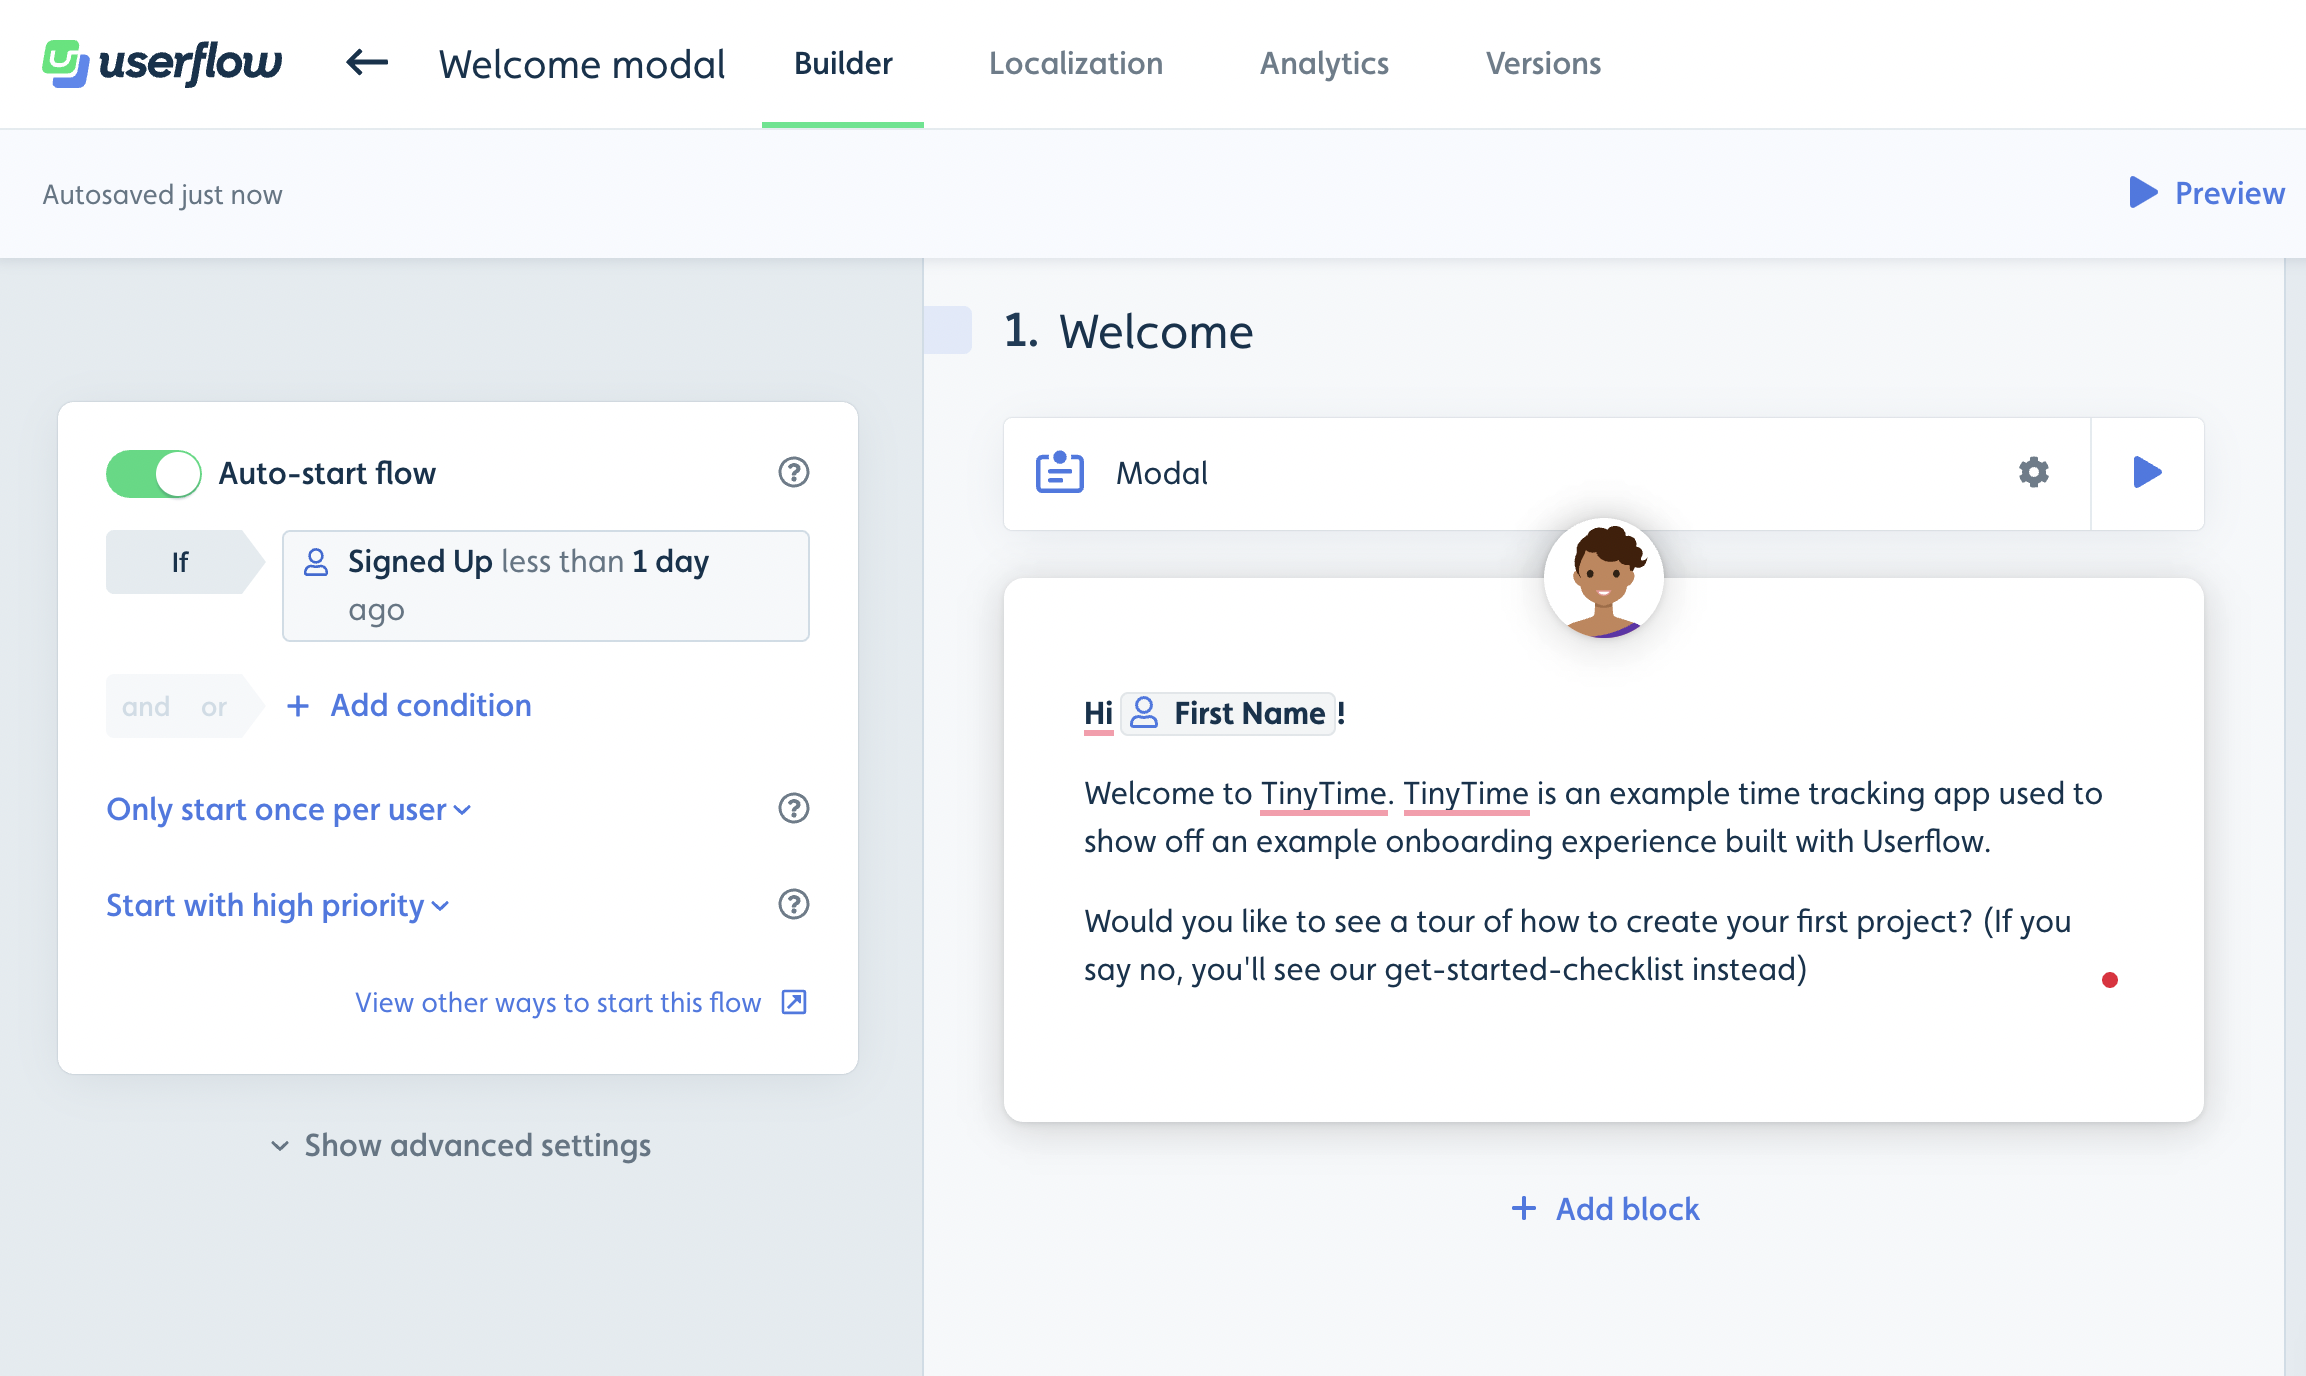
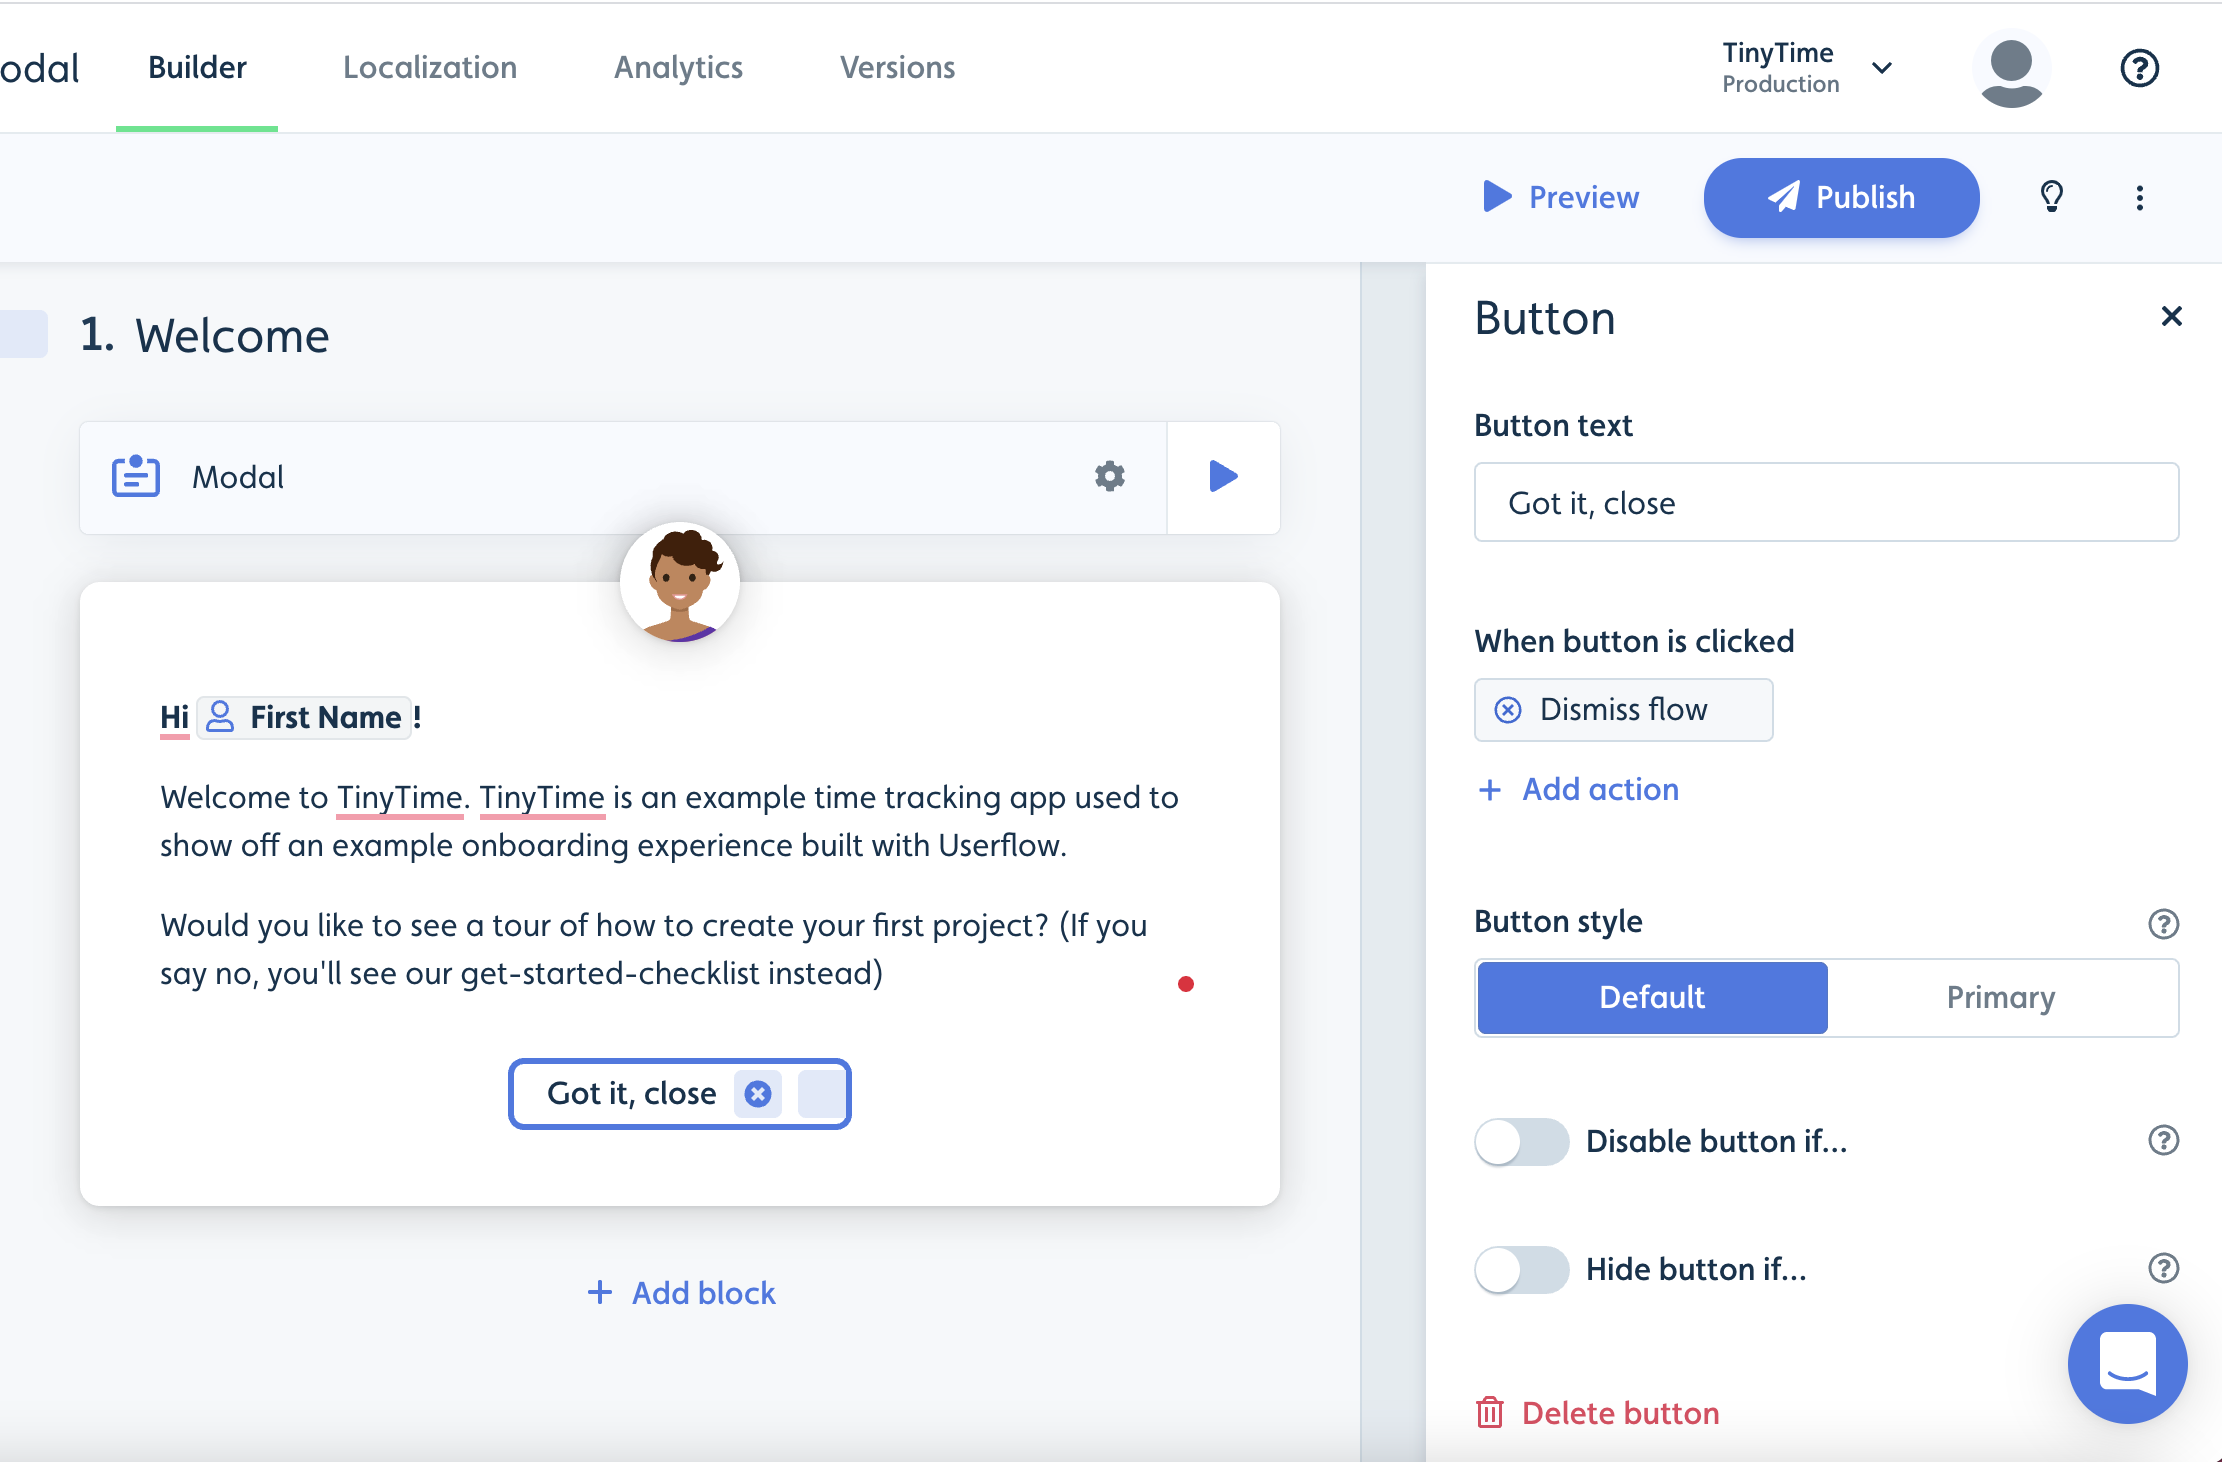
- Add a button by clicking on “Add Block” below the modal text. Until you have flows or checklists built, this button can just be a “Got it, close/Take me to the product” button that dismisses the modal. But over time you could have the button start another flow, or have 2 buttons: “Yes, show me” or “Not right now”.
- Click Preview to see the welcome modal in action via the Userflow chrome extension (no need to install Userflow.js to test your content). Make sure you choose “Run as: Test user” until you install Userflow.js in your app.

Step 2: Create your first flow(s)
Now with the welcome modal in place you can start building some simple flows (Guides/Tutorials) highlighting key actions you want the user to take. Userflow offers many advanced flow capabilities, but to keep things simple initially you can build a sequence of tooltips that takes the user through the different pages or a key action in your product. Examples could be:
- Create the first project
- Register time on your first project
- Add users
- Select a plan
Similar to the welcome modal, you create a flow by going to Flows → Create flow.
- Don’t set an auto-start condition for the flow, you can instead later use a checklist or a button in the welcome modal to trigger the flow(s).
- On Step 1 of the flow, select a “Tooltip” highlighting the first feature/menu item you want the user to click on. One of the powers of Userflow is that instead of using buttons inside the tooltips (which is also possible), you can trigger the next step based on an action the user takes in your product. As an example in step 1 in the screenshot below, the tooltip is shown at the “Projects” menu item, and if the user clicks it, they will go to the projects page and step 2.
- Userflow provides a very intuitive way to select the tooltip target element (i.e. what the tooltip should point to), without having to use CSS selectors. Simply click Select element, and it will take you to your app, where you can select the element. Userflow then stores a small screenshot of the element selected, making it easy for other users to understand the flow.
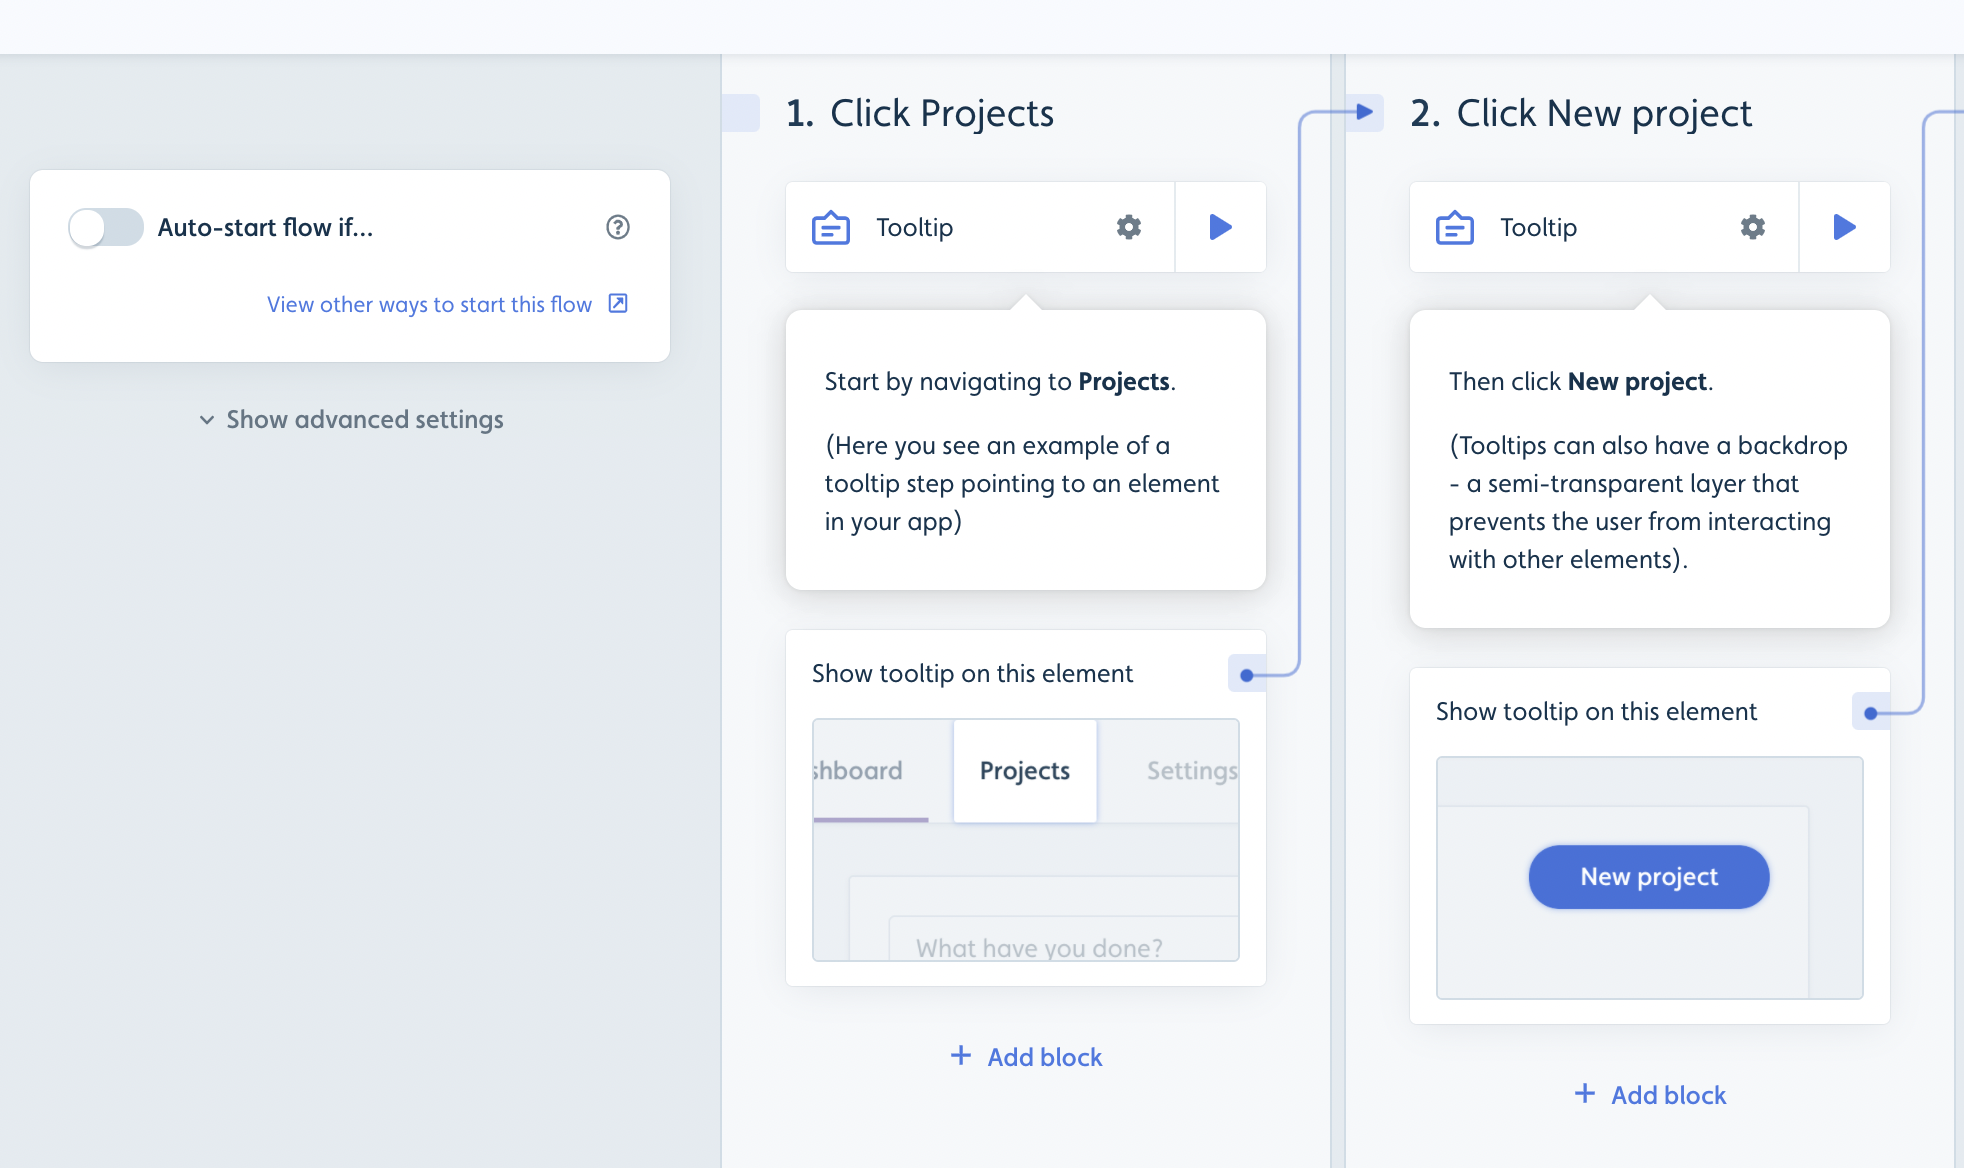
- When you have finalized the tooltip steps, a great way to end a flow is by having a modal as the last step, where you conclude on the flow and have a button to close it.

- Click Preview to test your flow in action
Step 3: Create an onboarding checklist
Now that you have welcomed your user and you have your first flows, you can structure your onboarding journey via a Checklist. A checklist is a great way to organize both onboarding flows as well as links to other external resources if needed.
You create a checklist by going to Checklists → Create checklist.
- Similar to the welcome modal, you can set an auto-start condition based on when the user signed up. To ensure that the welcome modal is always started before the checklist, you should set the checklist to “Start with low priority”.
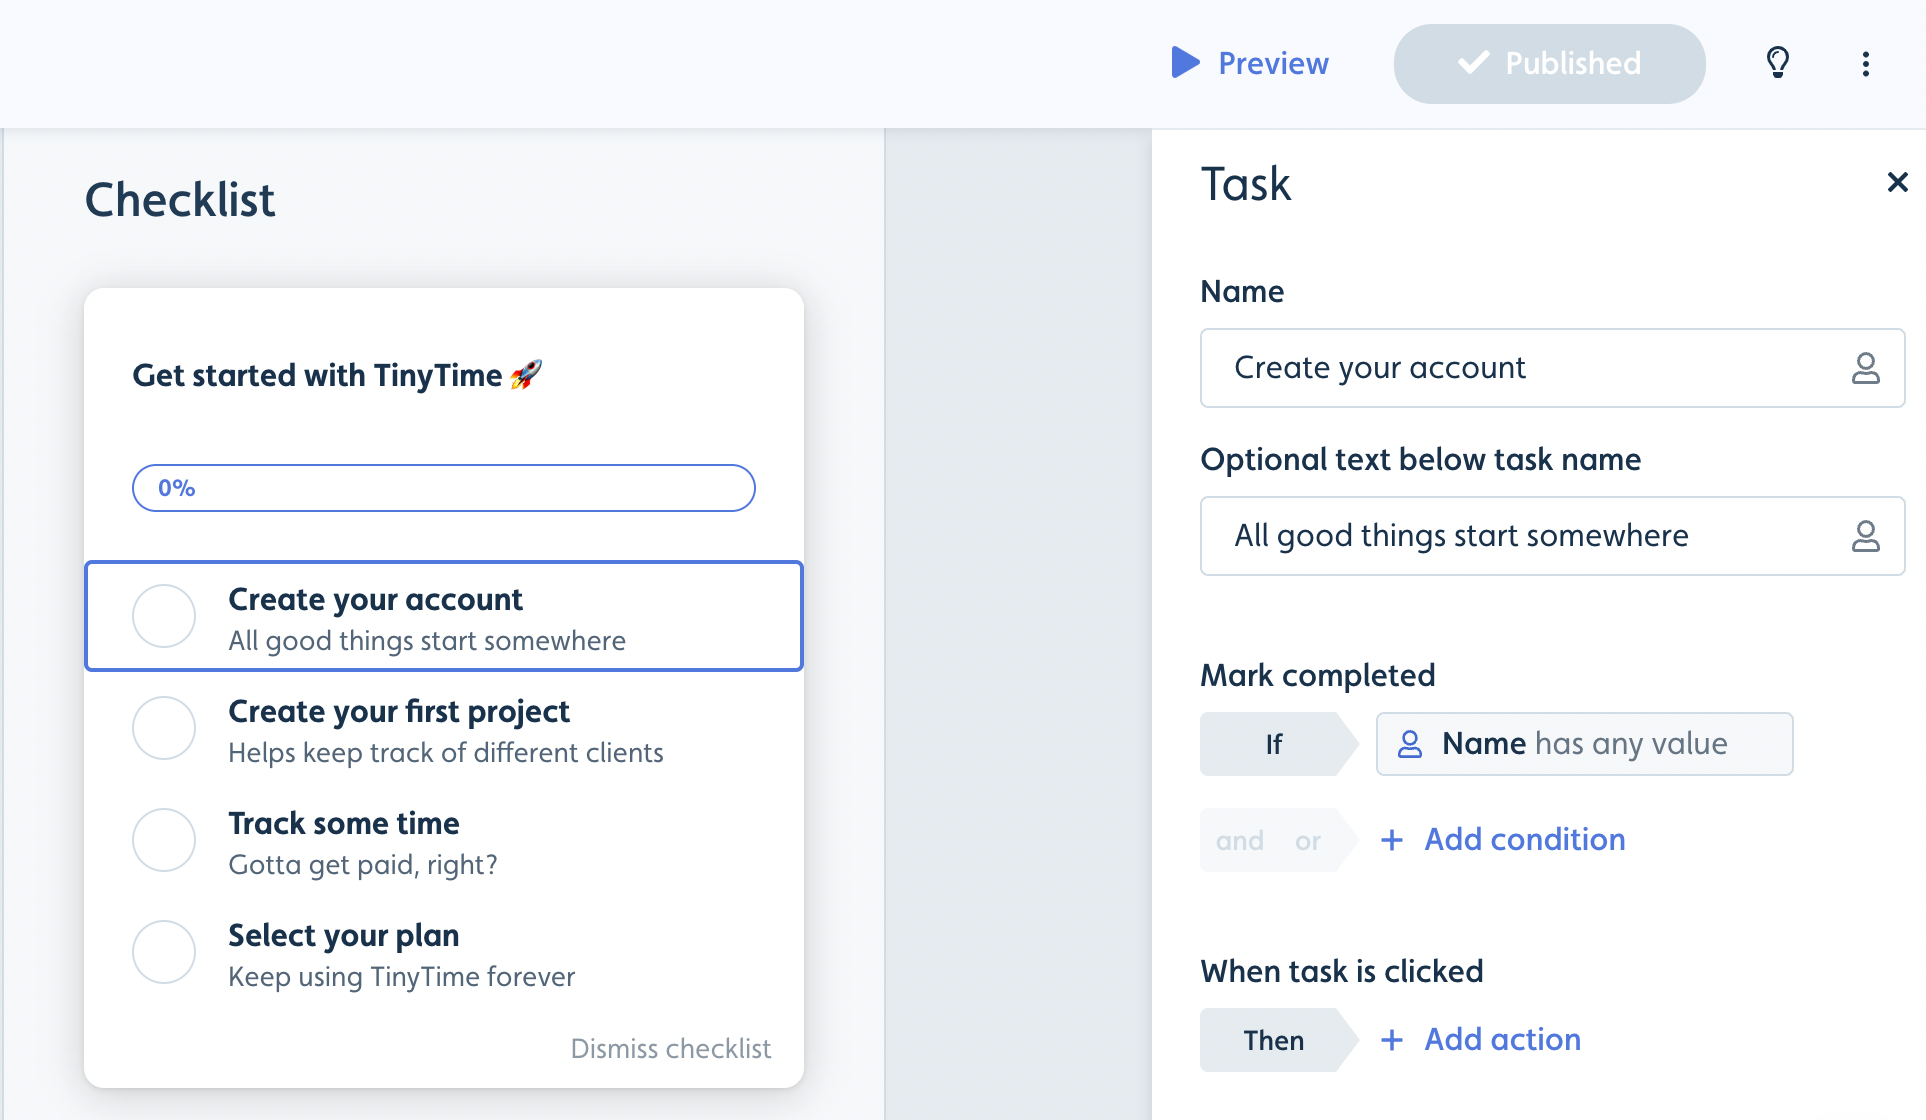
- Now you can start adding checklist tasks. A checklist task can either be set to start a flow or link to a page (internal/external)
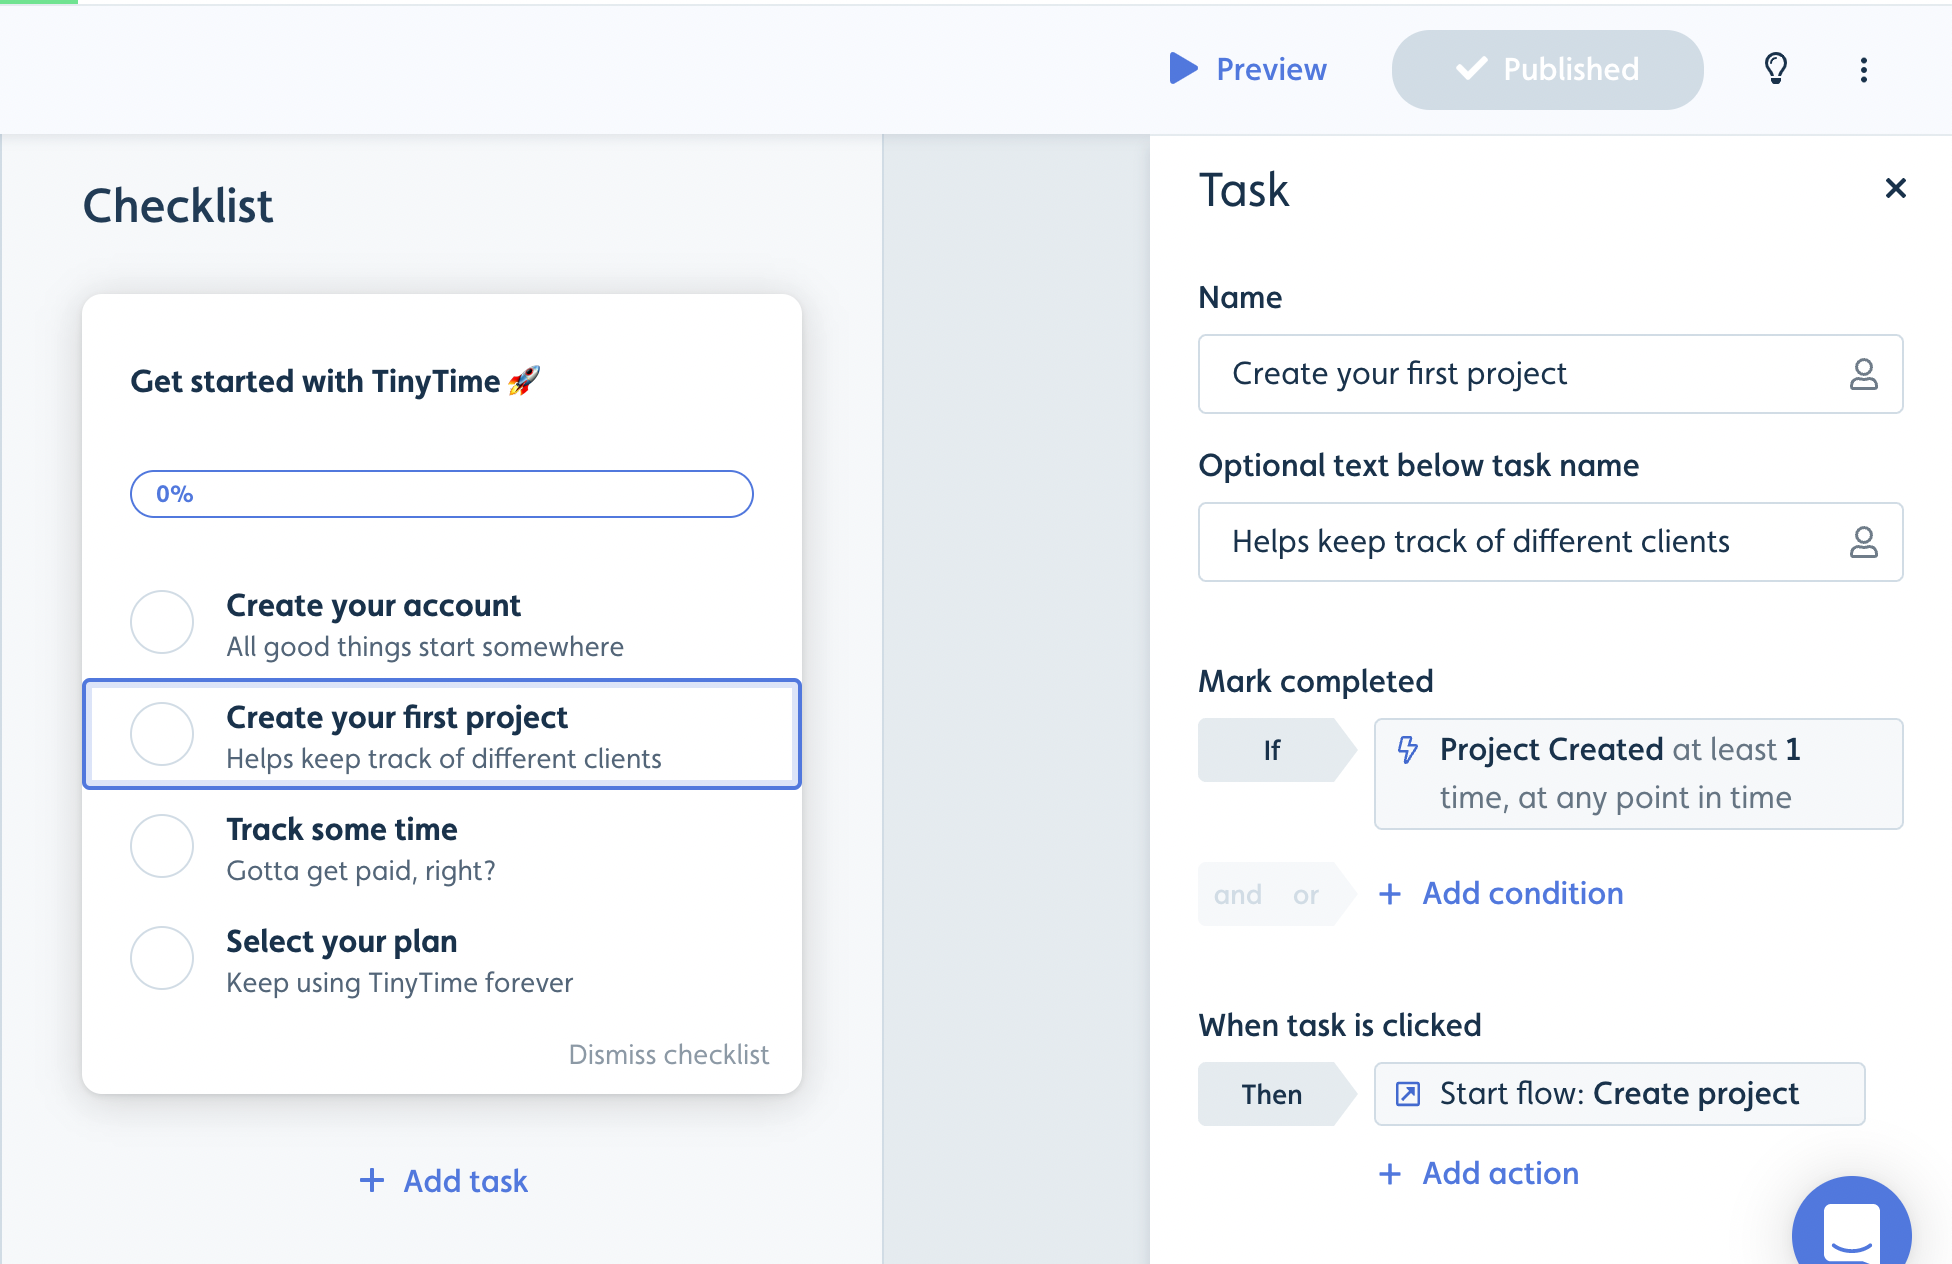
- You can decide when the checklist task should be marked completed, and you can also decide if a certain checklist task only should be available to specific users, e.g. based on an attribute.
- We recommend having the first task always be marked as completed. E.g. “Create your account”. There’s some psychological pull in wanting to complete something that has already started, vs. an empty checklist. Give it a completed condition that’s always true, such as “Current page matches *” or Name has a value. No action necessary - nothing happens when you click it.
- If you have an “ultimate action” that you want to guide users toward (e.g. selecting their plan if they’re on a free trial), adding that as the last task in the checklist works well. It could just link to your Billing page with a “Navigate to” action (TODO: Maybe show an example screenshot of the task side panel).
- In between the first always-completed task, and the last “ultimate action” task, we recommend starting small with just 2-4 other tasks.
- Click Preview to see your checklist in action.
Step 4: Customize your theme
Now that you have an amazing baseline onboarding experience, you’ll want to make it look like a native part of your app. Check out our Themes guide to learn how to change the look and feel of your modals, flows, and checklists.
Step 5: Ready for launch
Now all of your content is ready for launch.
-
Before you can launch, you or one of your engineers need to do the following 2 technical steps
- To be safe, we recommend launching your content into a staging/QA environment first - you can see a guide on how to set up another environment here.
- Install the Userflow.js snippet in both your staging and production application - See guide here
- When you have installed the Userflow.js snippet, go back to each of your flows/checklists and click Publish and deselect production to only publish to staging/QA.
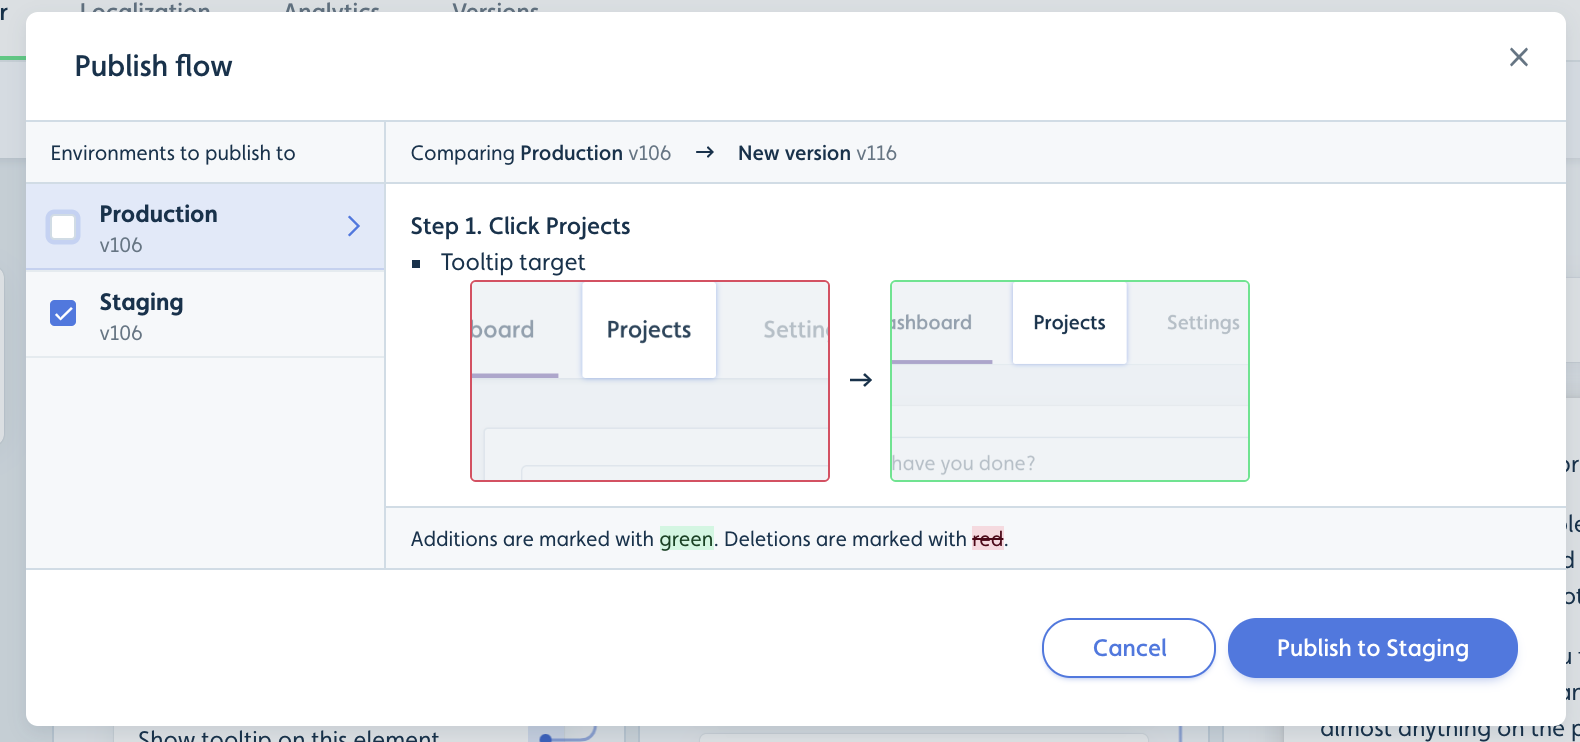
- After you have tested the content in QA/Staging, you can publish your content to production.
Step 6: Take your Onboarding to the next level
Now that you have your basic onboarding setup, you can start exploring some of the more advanced features of Userflow. Below is a list of some of the capabilities that Userflow offers:
- Launchers - Add custom icons/buttons that can launch checklists/flows.
- Flows that appear x days after signing up if you have not yet done y.
- Feature announcements - use launchers to highlight new features with tooltips.
- Segment based on user profiles (different Welcome modals and checklists depending on user type).
- Ask about use case using a survey question in the welcome modal, which you can then use to decide which flows to show.
- Companies - Group your users based on the company and company types they are from. Read more